Author Archives: saramackay23

My acting debut!

Standard

Finally, after 3 years in Los Angeles, I have made my acting debut! I might just be looking for a talent agent soon :)

Here is the video that my co-worker and good friend, Brian, and I helped create on a few months ago. We really do love working at Nestle!

Supply Chain Recruitment Video

My acting debut!!

Butternut Squash and Farro Salad

Standard

Hey everyone – Hope you all had wonderful Thanksgivings!! I’ve been in Wisconsin for over a week now and loving every minute of it!! I made this for dinner a few weeks ago and absolutely fell in love. So, I decided to make it for our Thanksgiving dinner with our family friends and everyone raved about it. Bottom line – you have to try this recipe!!Butternut Squash and Farro Salad
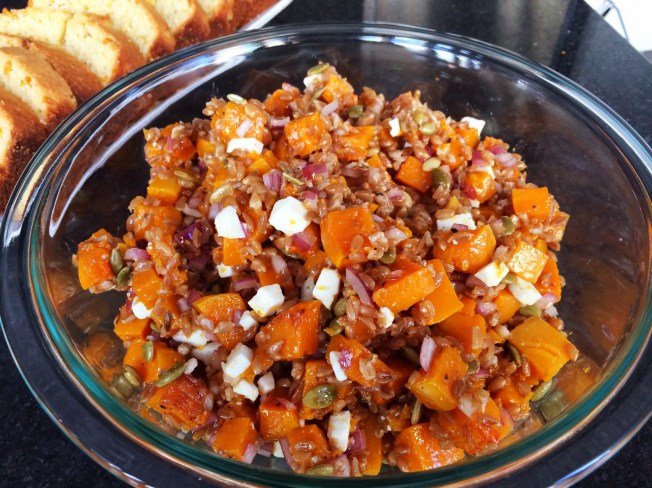
First off, are you wondering what farro is? It is a grain similar to barley that has a slight nutty flavor and is a bit crunchy in texture. It’s full of fiber and protein, so will keep you full for a long time! I have seen it in the bulk bins at different grocery stores, but you could also order it online. Here is the package I bought at Whole Foods:

Butternut Squash Salad with Farro and Pepitas

Preparing the butternut squash for roasting isn’t the easiest, so here’s how I did it. First, cut off both ends of the squash. Next, using a vegetable peeler, peel off the skin until you get to the orange meat on the inside. Then, cut the squash in half the long way and scoop out the seeds. Finally, dice into cubes.

Butternut Squash Salad with Farro and Pepitas

I could eat this all fall and winter long!Butternut Squash and Farro Salad 
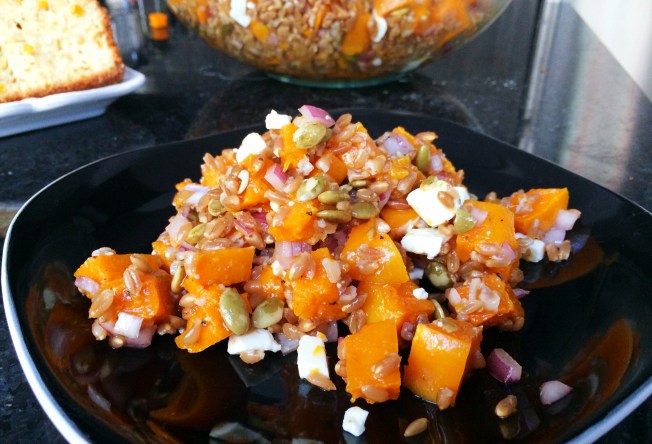
Butternut Salad with Farro, Pepitas and Feta

Serves 4 to 6, generously, as a main dish

1 medium butternut squash (about 2 pounds)
5 to 6 tablespoons olive oil, divided
Salt and freshly ground black pepper, to taste
1 cup farro
1/3 cup toasted pepitas (pumpkin seeds)
3 ounces feta (or another salty cheese) crumbled or chopped (about 3/4 cup)
1 tablespoon sherry or red wine vinegar
1 tablespoon water
1/2 teaspoon table salt
1/2 teaspoon granulated sugar
1/2 small red onion, finely chopped

Preheat oven to 375 degrees F.

Peel squash, then halve lengthwise and scoop out seeds. Cut squash into approximately 3/4-inch chunks. Coat one large or two small baking sheets with 2 tablespoons oil total. Spread squash out in single layer on sheet. Sprinkle with salt and freshly ground black pepper. Roast until pieces are tender, about 30 to 40 minutes, turning them over halfway through the cooking time. Set aside to cool slightly.

While squash is roasting, cook farro in a large pot of simmering salted water until the grains are tender but chewy, about 30 minutes. (Since there are so many varieties of farro, however, if your package suggests otherwise, it’s best to defer to its cooking suggestion. My farro called for soaking overnight, but I didn’t do that and it turned out fine.) Drain and cool slightly.

While squash is roasting and farro is simmering, in a small bowl, whisk together sherry vinegar, water, 1/2 teaspoon table salt and granulated sugar until sugar and salt dissolve. Stir in onion; it will barely be covered by vinegar mixture but don’t worry. Cover and set in fridge until needed; 30 minutes is ideal but less time will still make a lovely, lightly pickled onion.

In a large bowl, mix together butternut squash, farro, red onion and its vinegar brine, the crumbled cheese and pepitas. Toss with 3 tablespoons of the remaining olive oil, use the 4th one only if needed. Taste and adjust seasonings. Eat now or later. Salad keeps in the fridge for up to a week.

Adapted from Smitten Kitchen here.

Foil-Baked Tilapia with Vegetables

Standard

I’ve got another quick weeknight dinner option for you! This is what I ate for dinner every single night this past week…and loved it: tilapia and fall vegetables steamed in a perfect little foil package. You guys, this is probably the easiest dinner I’ve made this year and SO healthy! With the food-heavy holidays right on the horizon, give this recipe a try!

The recipe can be adapted to whatever vegetables you like or are in season at the moment. And this is why it’s so easy: On Sunday, chop up the vegetables you are going to use for the week. Then, each night create a foil packet of fish and vegetables, drizzle with a few seasonings, wrap it up and bake! A fresh meal each night!

I tried a little bit of a different combination with each dinner. I mainly used red pepper, squash, carrots, snap peas, and green onions. I happened to have fresh parsley on hand, so I chopped some of that up too.

Foil-Baked Tilapia with Vegetables

The second night, I added capers and sun dried tomatoes, which was delicious! I also threw in some broccoli and onion.

Foil-Baked Tilapia with Vegetables

When you pull it out of the oven, you can put it right on a plate and eat straight from the foil.

Foil-Baked Tilapia with Vegetables

I used Jenna’s recipe over at Eat Live Run as a guideline but improvised with my own ingredients. So feel free to check out her version, as well as mine, and add whatever veggies you want!

Foil-Baked Tilapia with Vegetables

Ingredients:

  • tilapia fillets (or other white, mild-flavored fish, fresh or frozen)
  • 1 red pepper, sliced into thin strips
  • 1 small squash
  • carrots
  • snap peas
  • green onions, sliced thin
  • garlic cloves, sliced thin (no need to mince since they will roast in the oven)
  • fresh herbs such as basil or parsley
  • lemon, juiced
  • extra virgin olive oil
  • balsamic vinegar
  • salt and pepper to taste
  • Other optional additions: capers, sun dried tomatoes, cherry tomatoes, zucchini, yellow onion, use your imagination…or whatever is in your fridge!

Directions:

Preheat your oven to 450 degrees.

In a bowl, combine the sliced vegetables, garlic, and herbs. Drizzle olive oil and lemon juice over the veggies and sprinkle with salt. Toss well.

Tear a square of tin foil about 12 x 24″. Fold it in half and place one fish fillet in the center. Add your vegetables on top of the fish, then drizzle with balsamic vinegar and add your desired amount salt and pepper. Wrap up the foil around the fish and fold in all sides tightly so that no steam escapes and you have a nice little package.

Place in the oven for 15-20 minutes, until the fish has baked through and flakes easily. (I used frozen filets and found it took closer to 30 minutes.) You can always check the fish by unwrapping the bundle and sticking a fork into the fish.

When it’s ready, pull out the foil package, unwrap on your plate, and dig in!


Chicken with Tabbouleh

Standard

Are you searching for a great meal to make once and have dinner or pack-able lunches for the week? This is what I made yesterday and am looking forward to eating all week! It’s Barefoot Contessa’s Chicken with Tabbouleh.

Chicken with Tabbouleh

The ingredients are so fresh and it’s satisfyingly healthy.

Chicken with Tabbouleh

If you can make this ahead, it tastes much better once the flavors have marinated together a bit. I made my chicken and bulgur the night before and then assembled everything the next morning. Also, pay attention to the type of bulgur wheat you are using. I bought quick cooking bulgur wheat, so had to adjust the ratio of water/lemon/olive oil that the bulgur soaks in according to the directions on the package.

Chicken with Tabbouleh

I served mine with some crumbled feta on top – it was the perfect finishing touch!

Chicken with Tabbouleh

Ingredients

  • 1 1/2 cups boiling water
  • 1 cup bulgur wheat
  • 1/4 cup freshly squeezed lemon juice (1-2 lemons)
  • Olive oil
  • Kosher salt
  • 1 whole (2 split) chicken breast, bone in, skin on (I just bought boneless chicken breasts)
  • Freshly ground black pepper
  • 1 cup minced scallions, white and green parts (1 bunch)
  • 1 cup chopped fresh mint leaves (I don’t like mint, unless it’s in a mojito!!, so I was tempted to leave it out, but it ended up not being too overpowering. If you don’t like mint, you could sub it for something else, like basil.)
  • 1 cup chopped fresh flat-leaf parsley (1 bunch)
  • 1 hothouse cucumber, unpeeled, halved lengthwise, seeded, and medium-diced
  • 2 cups halved cherry tomatoes (I used roma tomatoes, which worked just as well.)

Directions

Preheat the oven to 350 degrees F.

In a heat-proof bowl, pour the boiling water over the bulgur wheat. Add the lemon juice, 1/4 cup olive oil, and 1 1/2 teaspoons of salt. Stir. Cover the bowl with plastic wrap and allow the bulgur to stand at room temperature for about 1 hour.

Place the chicken breast on a baking sheet and rub it with olive oil. Sprinkle liberally with salt and pepper. Roast for 35 to 40 minutes, until just cooked. Set aside until cool enough to handle.

Remove the chicken meat from the bones and discard the skin. Cut the chicken into medium dice and add to the tabbouleh. Add the scallions, mint, parsley, cucumber, tomatoes, 2 teaspoons salt*, and 1 teaspoon pepper. (*Note: Ina calls for 2 teaspoons salt, but I thought this was too much. Start with 1 and add more later if necessary.) Season, to taste, and serve immediately or cover and refrigerate. The flavors will improve as it sits.

Here is the link to the recipe on food network: Chicken with Tabbouleh or you can find her Tabbouleh recipe in her cookbook “Parties”.

Enjoy!

Emeli Sandé – Next To Me

Standard

Last week Ashley, Elaine and I spent 6 hours in the car driving from Napa to LA. Needless to say, we listened to A LOT of music! Ashley introduced us to Emeli Sandé and I am now hooked on her song “Next to Me”. Emeli is a Scottish singer and songwriter and actually sang in both the opening and closing ceremonies of the 2012 London Olympics. Simon Cowell called her “his favourite songwriter at the minute” and whatever Simon says, I can’t help but believe!! Hope you enjoy this song as much as I do…

Eggs and Waffles

Standard

Good Morning everyone! Today I want to share with you one of my favorite weekend breakfasts. It tastes so indulgent because of the great sweet and salty combo! But, it’s very easy, reasonably healthy, and requires just a few ingredients!

First, toast 2 waffles – I love Kashi blueberry waffles.

Eggs and WafflesNext, while the waffles are toasting, fry two eggs in a pan coated in non-stick cooking spray. Once the eggs are done, put one on top of each waffle and drizzle with syrup. It’s so simple, it almost seems silly to share! But, it’s not something you’ve probably thought of trying. I hope you will give this combination a shot – my mouth is watering just thinking about it!!

Eggs and Waffles

Burrito Bowls

Standard

If you get excited about Chipotle burrito bowls like I do, then this recipe is for you! Burrito bowls are one of my favorite meals to make ahead on a Sunday, and then eat for dinner the rest of the week. It’s very quick to assemble a bowl on a weeknight after work. You can heat it up if you like or I find it deliciously refreshing chilled straight from the fridge. My friend, Kiki, was visiting me this past weekend, so we made these for dinner Saturday night and then had a great lunch to whip together on Sunday when we came up for a break from the beach!

I like to use Jenny-O taco seasoned ground turkey. It’s got great flavor and all you have to do is brown it in the pan. Whenever it’s on sale at the grocery store, I always buy some to stick in my freezer.

Burrito Bowls with Jennie-O turkey

Then, chop up all of the vegetables and drain the beans and corn. I immediately put the ingredients in tupperware so it’s easy to store in the fridge. Here are all of the things that I like to add to my burrito bowl:

Burrito Bowls

Burrito Bowl

This is a rough estimate of measurements for an individual bowl. When I go to the store, I always end up buying a couple tomatoes, a bunch of green onions, cilantro, a couple avocados…and then just chop it all up. Each night, the mix changes a little bit:

  • ½ cup ground turkey (I use Jennie-O taco seasoned)
  • ¼ cup tomatoes
  • ¼ cup canned corn
  • ¼ cup black beans
  • ¼ avocado
  • Green onions – as much as you like
  • Cilantro – as much as you like

For the “sauce”

  • Greek yogurt – 1-2 spoonfuls (or you can use sour cream, but it’s a great guilt-free substitute!)
  • Salsa – 2-4 spoonfuls
  • Chili powder and cumin – a couple shakes of each for some heat and flavor
  • Lime juice – 1 slice to squeeze over the top

Other possible add-ins

  • Shredded cheese
  • Rice – could be great if you want to make for a lot of people and bulk up the dish

Burrito BowlsYUM!!!

International Day of the Girl

Standard

Yesterday was the first International Day of the Girl, a day that advocate’s girls’ rights, as declared by the UN. (Read this article by the UN to learn more about the cause and this year’s theme of ‘ending child marriage’.) CNN put together a slideshow, asking some of today’s most accomplished women, “What one piece of advice would you give your 15-year-old self?” When you have some time, you can read through the full slideshow here. One of my favorite quotes is from Robin Bernstein, a historian and professor at Harvard, shown below. I think we could all use this advice at ANY age!! Stop worrying so much about the future and remember to enjoy the moment.

International Day of the Girl“I have bad news for you: You are not clairvoyant. Not even a little. You have no idea how the future will unfold. But it will unfold, slowly and quickly and slowly again, in ways that you cannot now begin to imagine. So stop trying to guess what’s coming next. All the effort you put into figuring out what will happen, all the scenarios you play out in your mind — they’re useless. And that’s a good thing. Relax and let the future arrive on its own time and in its own way. Allow yourself to be astonished.” (Robin Bernstein)

Loose Tea Strainer

Standard

Since we don’t have leaves that change colors here, one of our first signs of fall is the surfers that start wearing their wetsuits out in the water. This morning, the ocean break was dotted with what looked like little black seals, only a few brave surfers were left bare-skinned. So far, fall has brought us some beautiful sunsets…

As the temperatures cool off, what sounds better than a warm cup of tea? If you are a tea drinker, let me share with you my FAVORITE way to make tea and the strainer that makes it happen. I gave my mom one of these tea strainers for mother’s day and she loved it so much that she had to buy a 2nd one for the cabin. (You can also purchase a similar, cheaper version on amazon.)

Have you discovered the world of loose leaf teas (meaning no tea bag, just a bag of the tea leaves themselves)? My absolute favorite is Blueberry Rooibos from Alterra, a local coffee shop chain in Milwaukee:

Altera Blueberry Rooibos Tea

Generally, the problem with loose leaf teas is that they leak into your mug as you are steeping them so that you have some “nature” floating around in there. I couldn’t seem to avoid this with my old ball and chain strainer. However, this particular tea infuser completely solves that problem and is so easy to use! The mesh strainer does not let any of the leaves through and rests on top of your mug as it steeps:

Loose Tea Strainer

Just fill with a spoonful of your favorite loose tea:

Loose Tea Strainer

Steep for several minutes, depending on the type of tea, and then lift it out when ready:

Loose Tea Strainer

How great is that?? I hope you will enjoy this as much as my mom and I do! And I hope it brings more warm cups of tea into your life this fall!

Mocha Chocolate Icebox Cake

Standard

Hello again, everyone! I’ve been holding out on you over the past few weeks while I took a trip up to Oakland. I went up there to visit Andrew, the Nestle ice cream headquarters, and a visit to both Sonoma and Napa. It just so happened that two of my good friends from home were vacationing in Sonoma and I got to meet up with them!!

Sonoma VisitSonoma Visit

But now, for the recipe I’ve been waiting to share with you…Ina Garten’s Mocha Chocolate Icebox Cake. Seriously, the best dessert I’ve made in a LONG time. You can’t go wrong with a Barefoot Contessa recipe, but this one tops the charts!! I have been dreaming about this cake ever since I made it! It’s the kind that you first have a piece (or two) with dinner, and then cut a sliver with breakfast the next morning to make sure that is was really that amazing, and then might as well have another little piece with lunch to remember how good it is, and then obviously after dinner it’s time for more dessert…I AM NOT KIDDING!

Mocha Chocolate Icebox Cake

The cake is made up of layers of thin crispy cookies and rich, creamy, fluffy mocha. The combination of textures and flavors is unreal. My girlfriends and I LOVE this cake. And aside from the cookies, it’s a no bake cake! (You could even buy the cookies from the bakery or order them online like Ina from Tate’s Bake Shop.) I used a tub of  refrigerated cookie dough.

Mocha Chocolate Icebox Cake

It looks pretty to garnish with a little chocolate on top:

Mocha Chocolate Icebox Cake

Mocha Chocolate Icebox Cake

Ingredients

  • 2 cups cold heavy cream
  • 12 ounces Italian mascarpone cheese
  • 1/2 cup sugar
  • 1/4 cup coffee liqueur, such as Kahlua
  • 2 tablespoons unsweetened cocoa powder, such as Pernigotti
  • 1 teaspoon instant espresso powder
  • 1 teaspoon pure vanilla extract
  • 3 (8-ounce) packages chocolate chip cookies, such as Tate’s Bake Shop
  • Shaved semisweet chocolate, for garnish

Directions

In the bowl of an electric mixer fitted with the whisk attachment, combine the heavy cream, mascarpone, sugar, coffee liqueur, cocoa powder, espresso powder, and vanilla. Mix on low speed to combine and then slowly raise the speed, until it forms firm peaks.

To assemble the cake, arrange chocolate chip cookies flat in an 8-inch springform pan, covering the bottom as much as possible. (I break some cookies to fill in the spaces.) Spread a fifth of the mocha whipped cream evenly over the cookies. Place another layer of cookies on top, lying flat and touching, followed by another fifth of the cream. Continue layering cookies and cream until there are 5 layers of each, ending with a layer of cream. Smooth the top, cover with plastic wrap, and refrigerate overnight.

Run a small sharp knife around the outside of the cake and remove the sides of the pan. Sprinkle the top with the chocolate, cut in wedges, and serve cold.

Source: Barefoot Contessa “How Easy Is That?”